How to Schedule Social Posts from Claude or ChatGPT (2026)
A step-by-step setup guide for connecting an AI assistant to your social accounts over MCP. Exact menus for Claude, ChatGPT and Codex, why ChatGPT needs the key in the URL, and what to do when the tools don't load.

What does it actually take to schedule a post from an AI assistant?
Four things: an account with a scheduler that runs an MCP server, an API key, one connector added to your assistant, and about five minutes.
Once that’s done, “take these three bullet points, write a LinkedIn post and an X thread, and schedule both for Tuesday at 9am” is a single instruction, and the assistant makes the calls itself. No copy-pasting between a chat window and a dashboard.
This guide covers the exact setup for Claude, ChatGPT and Codex, because all three handle it differently and two of the three have a gotcha worth knowing before you start. If you want the background on what MCP is before wiring anything up, start here — this page assumes you just want it working.
I build Social by InstantDM, so the examples use our server at https://socialbyidm.com/mcp. The steps are the same for any scheduler with a hosted MCP server; swap the URL and key. Where a client’s behaviour is a limitation of that client rather than of any particular server, I’ve said so.
Every menu path, config key and limit below was checked against Claude’s and OpenAI’s own documentation on 28 July 2026. Setup guides rot faster than any other kind, because a vendor can rename a settings menu in an afternoon. If a step doesn’t match what you see, trust your screen over this page and check the vendor’s docs — and if it’s badly out of date, tell me.
What do you need before you start?
Three things, and it’s worth having all three open before you touch any settings:
- An API key from your scheduler. Ours is in the app under your workspace settings. Scope it to one workspace if you can.
- The server URL. Ours is
https://socialbyidm.com/mcp. It’ll usually end in/mcp. - At least one connected social account, so your first test returns something real rather than an empty list.
One thing you don’t need: any install, SDK or local process. A hosted MCP server uses the Streamable HTTP transport, which means it runs on the vendor’s infrastructure and your assistant connects over the network. There’s nothing to run on your machine.
How do you connect it to Claude?
Claude has the cleanest setup of the three, and it supports header authentication properly.
How do you add the connector in the Claude app?
Start in the composer rather than in Settings. Click the + button beside the message box, then Connectors → Add connector → Add custom connector.
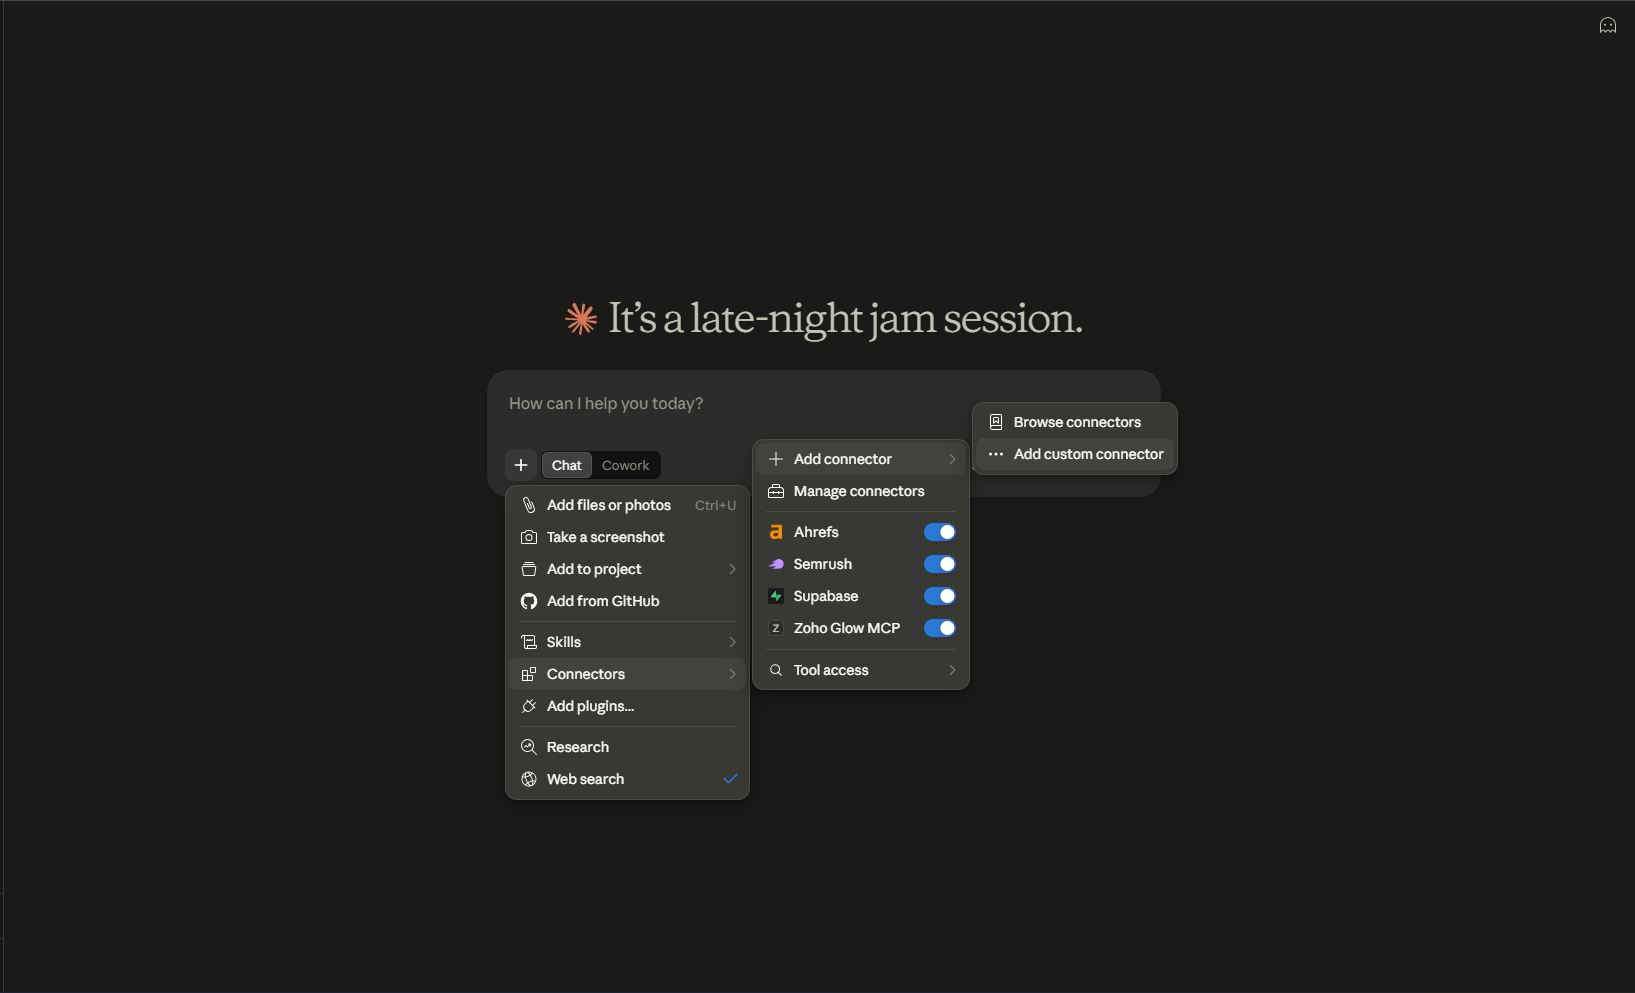 The + button in the composer, not the Settings page. Connectors → Add connector → Add custom connector.
There’s also a Connectors page under Settings that reaches the same dialog. The composer route is faster and it’s the one you’ll already have open.
The dialog itself asks for two obvious things and hides a third:
- Name — anything you’ll recognise later, such as “Social by IDM”.
- URL —
https://socialbyidm.com/mcp. - Expand “Advanced settings”, then paste your key into the API KEY field.
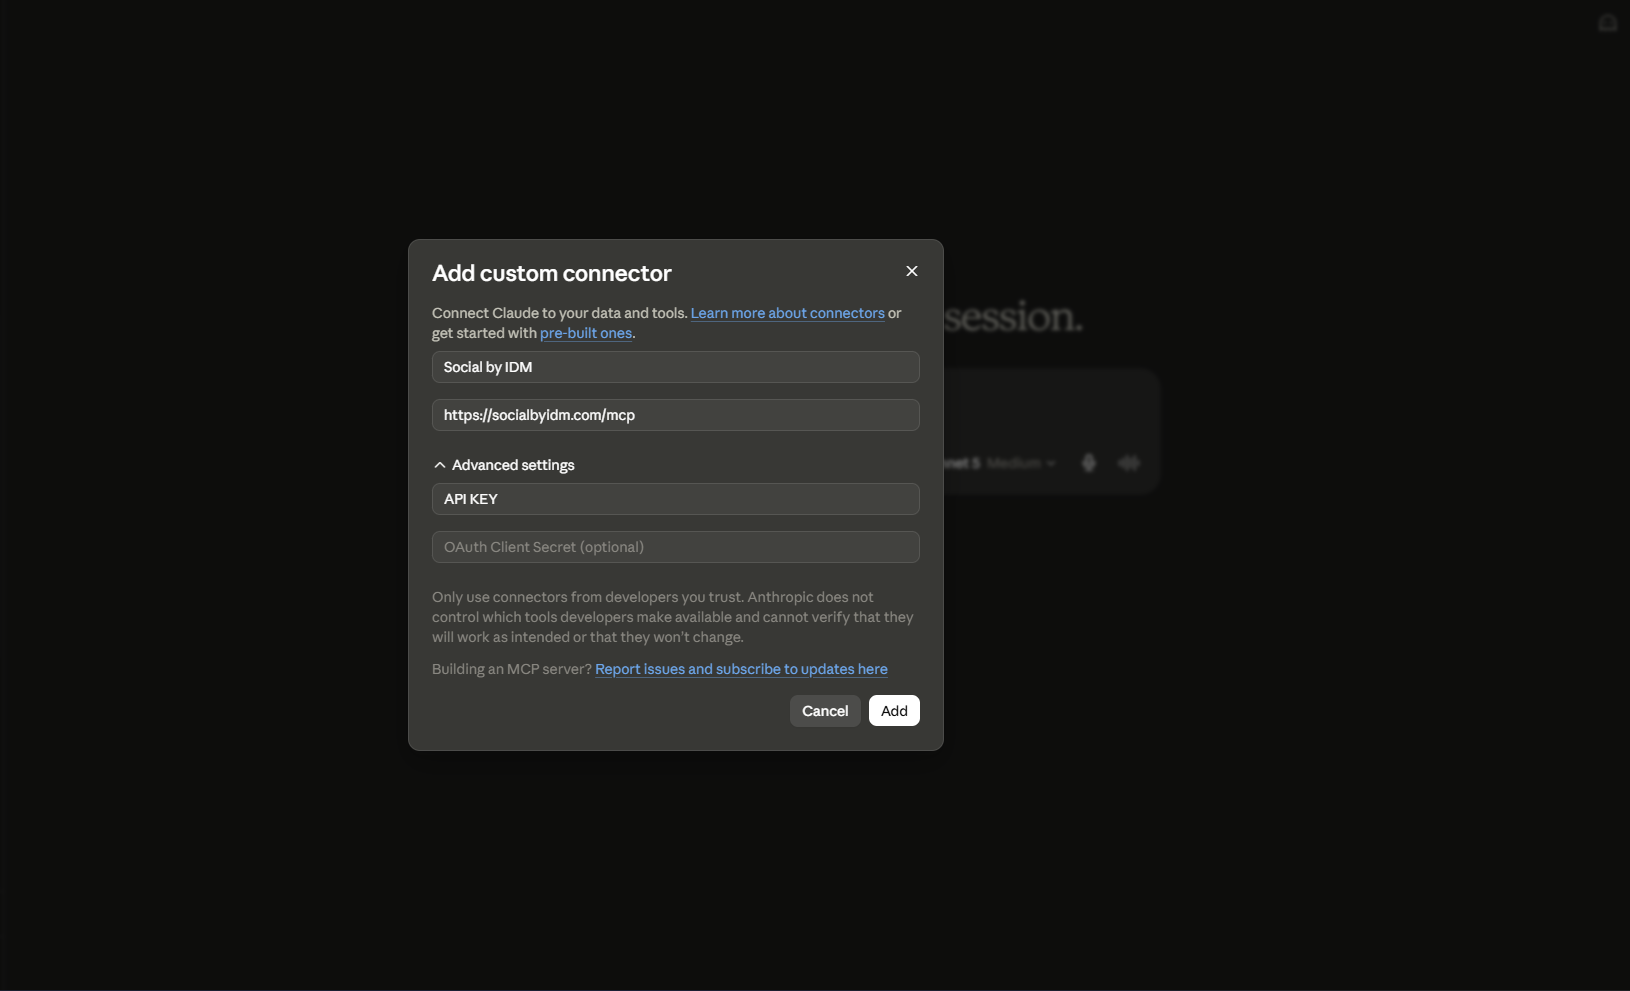 The API KEY field lives under Advanced settings, which is collapsed by default.
Step 3 is where people get stuck. Advanced settings is collapsed when the dialog opens, so the API key field isn’t visible, and nothing stops you pressing Add without one. You get a connector that appears to save correctly and then loads no tools. If that’s happened to you, reopen it and check the key rather than assuming the URL is wrong.
Leave OAuth Client Secret empty — that field is for servers that authenticate with OAuth rather than an API key. Then press Add.
Claude also shows a warning in that dialog worth actually reading: “Only use connectors from developers you trust. Anthropic does not control which tools developers make available and cannot verify that they will work as intended or that they won’t change.” That’s a fair caveat. Connecting any MCP server means trusting its vendor with whatever access your key grants, which is the argument for scoping the key narrowly.
Claude supports both Streamable HTTP and the legacy HTTP+SSE transport, though as of 2026 the legacy one is being deprecated in favour of Streamable HTTP. Any current hosted server will be using the former.
How do you add it to Claude Code instead?
If you work in a terminal, skip the settings UI entirely:
claude mcp addThen check the connection with:
/mcpThat prints the connection status for every configured server, which makes it the fastest way to tell a bad URL from a bad key.
What Claude limits should you know about?
Two worth knowing before you ask it for a year of analytics:
- Tool result size. Around 150,000 characters in the Claude app and Claude Desktop; 25,000 tokens in Claude Code, configurable via
MAX_MCP_OUTPUT_TOKENS. - Timeout. 300 seconds (five minutes) in the app and Desktop; configurable in Claude Code via
MCP_TOOL_TIMEOUT.
Neither matters for scheduling a post. Both matter if you ask for a bulk analytics pull across every account and a year of history, which is the request most likely to hit a ceiling.
Claude supports tools, prompts and resources, and both text and image tool results. It does not yet support resource subscriptions or sampling, neither of which a scheduling server needs.
How do you connect it to ChatGPT?
This one works, but it’s the most restricted of the three and the steps are non-obvious.
Where is the connector setting in ChatGPT?
- Open Settings → Security and login and turn on Developer mode. OpenAI’s documentation lists this first, and if you can’t find the Plugins area at all, this is why.
- Go to Plugins and press the + button at the top right.
- Fill in the New Plugin dialog.
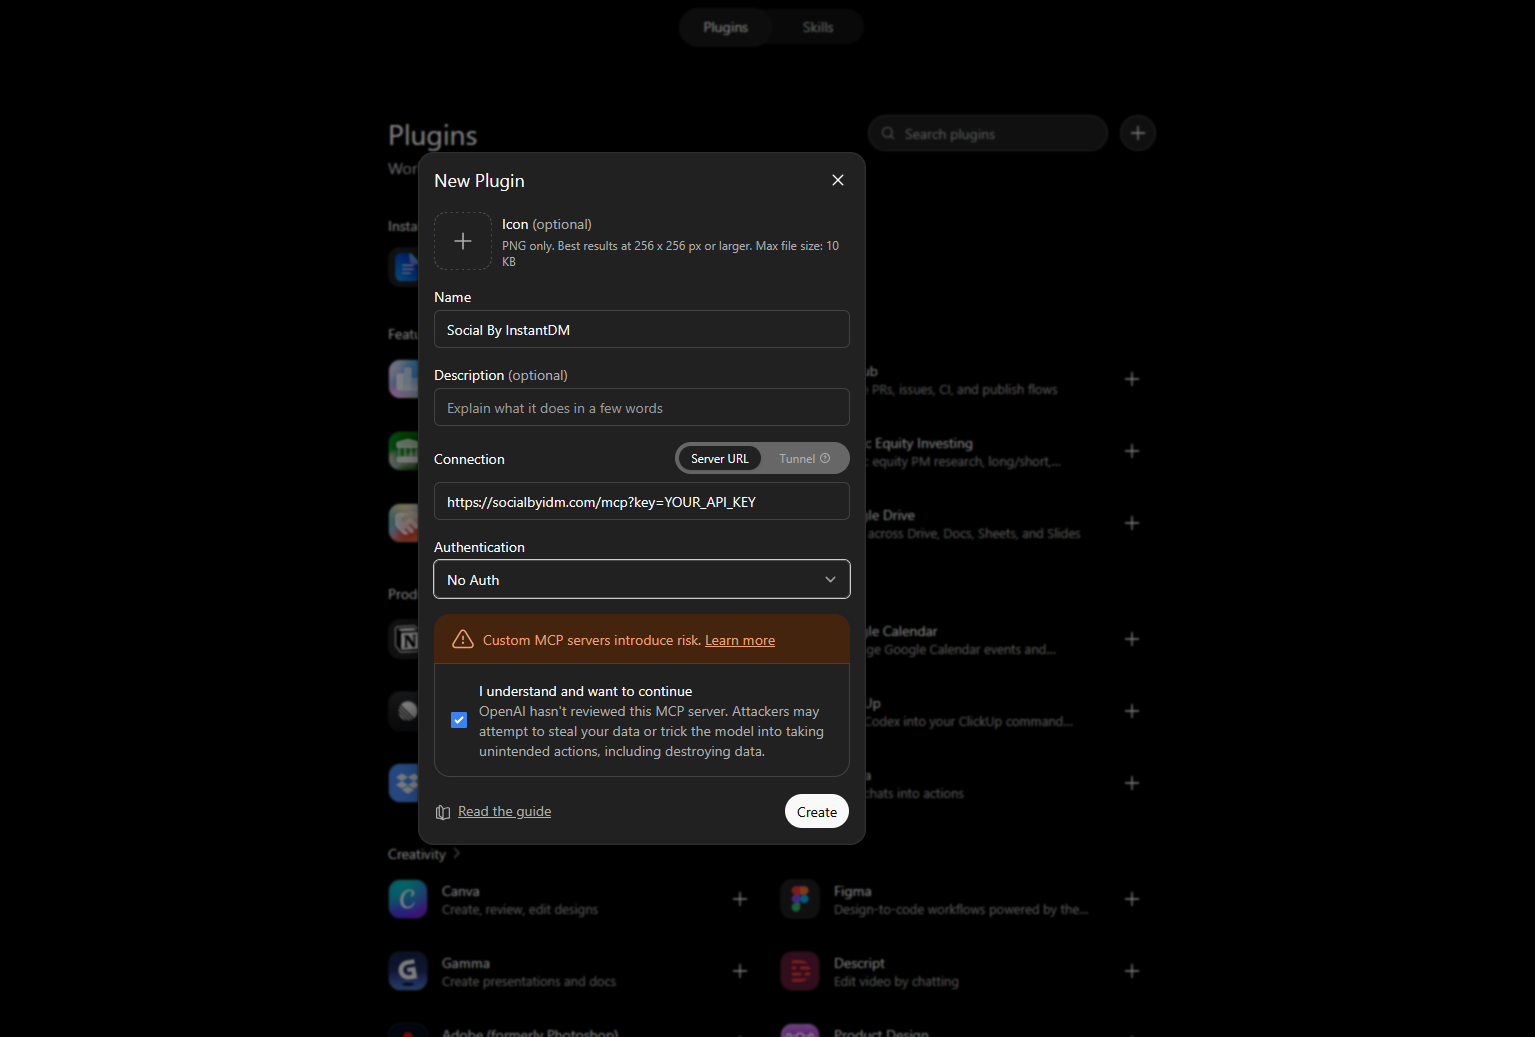 The key goes in the URL, and Authentication is set to No Auth — because there’s nothing left for ChatGPT to send separately.
The fields that matter:
- Name — anything recognisable.
- Connection — leave it on Server URL. The Tunnel option beside it is for exposing a server running on your own machine, which a hosted scheduler isn’t.
- URL —
https://socialbyidm.com/mcp?key=YOUR_API_KEY, with your real key substituted. - Authentication — set to No Auth.
- Icon and Description are optional and don’t affect whether it works.
Then tick the acknowledgement checkbox and press Create.
Why does ChatGPT need the key in the URL?
Because there’s nowhere else to put it.
OpenAI’s documentation for connecting remote MCP servers, as it stands in July 2026, covers OAuth — Client ID Metadata Documents, public-client token exchange, signed client assertion, dynamic client registration. What it does not document is a way to set custom HTTP headers on a connector.
That’s a problem if your server authenticates with an X-Api-Key header, because the ChatGPT screen takes a URL and not much else. The workaround is a server that also accepts the key as a query parameter:
https://socialbyidm.com/mcp?key=YOUR_API_KEYWe support that form specifically because URL-only clients exist. This is also why the Authentication dropdown gets set to No Auth: the credential is already travelling inside the URL, so there’s nothing for ChatGPT to attach separately. “No Auth” describes what ChatGPT is doing, not whether the server is protected.
Treat that URL as a secret — it contains your key in plain text, so anyone who sees it has your key. Don’t paste it into a shared doc, a support ticket, or a screenshot. It also lands in the plugin config rather than a credential store, so rotate the key if you ever share your screen while that dialog is open.
ChatGPT is blunter than Claude about the risk, and the warning is worth reading rather than clicking past. You have to actively tick a box that says: “OpenAI hasn’t reviewed this MCP server. Attackers may attempt to steal your data or trick the model into taking unintended actions, including destroying data.”
That’s an accurate description of the threat model for any MCP server, in any client — Claude shows a gentler version of the same caveat. It’s the argument for scoping your key to one workspace and for the drafting-before-publishing order further down this page.
What doesn’t work in ChatGPT today?
One 2026 limitation worth flagging if you’re planning to use MCP with deep research specifically rather than ordinary chat: OpenAI’s documentation states that servers used that way need to implement two read-only tools, search and fetch, and that servers used via the API for deep research must be configured with no approval required.
A social scheduling server has neither of those tools, because its job is publishing rather than retrieval. So expect the connector to work for ordinary chat-driven scheduling, and don’t expect it to slot into a deep research workflow.
How do you connect it to Codex?
Codex supports both local stdio servers and remote Streamable HTTP servers, and unlike the ChatGPT app it handles custom headers properly. If you live in a terminal, this is the nicest of the three.
What does the config entry look like?
Remote servers go in ~/.codex/config.toml under an [mcp_servers.<name>] table. The url key is required and auth is optional:
[mcp_servers.socialbyidm]
url = "https://socialbyidm.com/mcp"

[mcp_servers.socialbyidm.http_headers]
X-Api-Key = "YOUR_API_KEY"
As of July 2026, Codex documents four authentication approaches: bearer tokens via bearer_token_env_var, OAuth (run codex mcp login <server-name>), ChatGPT session authentication for trusted first-party servers, and static HTTP headers via http_headers or environment-sourced headers via env_http_headers.
Use env_http_headers rather than http_headers if you’d rather not have a key sitting in a config file, which on a shared or synced machine you probably wouldn’t.
Note that codex mcp add <server-name> --env VAR=VALUE -- <command> is the stdio form, for servers that run as a local process. A hosted social scheduler isn’t one, so use the config file.
How do you verify the connection actually worked?
Don’t assume it did. Ask:
What social media tools do you have available?
The assistant calls tools/list and reads the names back. That single question confirms two separate things: the connection is live, and your key authenticated. In Claude Code, /mcp tells you the same thing more directly.
If the list comes back empty or the assistant says it has no such tools, it’s almost always one of these:
- Wrong URL, or missing the
/mcppath - Key not accepted, or pasted with a trailing space
- In ChatGPT, Developer mode not enabled, or the key not in the URL
- In Codex, header block under the wrong table name
It is almost never the assistant being confused. An MCP connection either resolves and authenticates or it doesn’t.
What should your first command be?
Something that can’t publish anything:
List my connected social accounts.
That calls list_accounts, returns your real account list, and proves the whole chain works end to end. If it comes back with your actual accounts, you’re connected.
Then work up in this order, checking each step before moving on:
- Read — list accounts, list scheduled posts, pull analytics
- Draft — have it write a post without scheduling it
- Schedule — create a post with a future timestamp you can still cancel
- Publish — only once you trust the first three
Skipping to step four on day one is how people end up with a half-finished draft on a live company account.
How do you schedule one post across several platforms?
This is where it stops being a novelty. A single instruction:
Take the three bullets below, write a LinkedIn post in a professional register and an X thread in a punchier one, and schedule both for Tuesday 9am. Show me the drafts before scheduling.
The assistant drafts both, shows you, then calls create_post per platform with the right timestamp. The “show me before scheduling” clause is the important half — it turns an autonomous action into a reviewed one, and it costs you one extra turn.
Our server exposes 16 tools covering accounts, posts, media, analytics and native platform posts, plus a platform_request escape hatch for anything the wrapped tools don’t cover. In practice most scheduling work runs through four of them: list_accounts, create_upload_url, create_post and get_post_status.
What can go wrong?
Three failure modes worth anticipating, none of which are the assistant’s fault.
It schedules for the wrong time. Timezones are the most common real problem. Say “9am IST” rather than “9am” and confirm the timestamp on the returned post rather than trusting the confirmation sentence.
It invents a platform limit. An assistant may assume a character limit or media rule from training data rather than checking. If a post gets rejected at publish time, read the error from get_post_status rather than asking the assistant why it thinks it failed.
It does more than you asked. “Schedule a post about the launch” is an instruction with a lot of latitude. Being specific about count, platform and timing costs one extra sentence and avoids five posts you didn’t want.
Should you let it publish immediately?
Not at first, and possibly not ever.
The safe default is scheduling, not publishing. A scheduled post sits in a queue you can inspect and cancel; a published post is public the instant the call returns. Everything useful about this workflow survives that restriction.
Two other guardrails worth having:
Scope the key to one workspace, so a mistake is contained to one client or brand rather than everything you manage.
Watch the trust boundary. If the same assistant reads untrusted input — web pages, incoming email, submitted content — and also holds publishing access, there’s a path from something you didn’t write to something published in your name. Keep those two capabilities apart until you’ve thought it through properly.
Which assistant is best for this?
Depends where you already work, but the three aren’t equal:
| Setup | Header auth | Best for | |
|---|---|---|---|
| Claude | Settings → Connectors, or claude mcp add | Yes | Most people; cleanest setup, works in app and terminal |
| Codex | ~/.codex/config.toml with http_headers | Yes | Terminal-first workflows, key kept in env vars |
| ChatGPT | Developer mode → Plugins | Not documented — key goes in the URL | People already living in ChatGPT |
Claude if you want the shortest path and don’t want a key in a URL. Codex if you’re in a terminal anyway and want the key in an environment variable rather than a settings screen. ChatGPT works, with Developer mode and the query-parameter form, and is the right answer if it’s simply where you already are.
Whichever you pick, the server is the same. That’s the point of a standard: set it up once, and moving assistants later is a URL and a key, not a migration.
The one thing I’d expect to change during 2026 is the ChatGPT column. Developer mode and a key in the URL is a workaround, not a destination, and the gap between it and Claude’s setup is the kind of gap that closes. Re-check that row before you architect anything around it.
Frequently asked questions
Can Claude schedule social media posts for you?
Yes, once you connect a social scheduling MCP server as a connector. In the Claude app, click the + button in the composer, then Connectors > Add connector > Add custom connector, and give it a name and the server URL. The API key field sits under Advanced settings, which is collapsed by default — this is the step most people miss, and skipping it produces a connector that saves fine but loads no tools. In Claude Code you run `claude mcp add` and check status with `/mcp`. After that you can tell Claude to draft and schedule a post in plain language and it calls the scheduling tools directly.
Can ChatGPT post to social media?
Yes, through a remote MCP connector, but the setup is more restricted than Claude's. You turn on Developer mode under Settings > Security and login, then add the server URL under Plugins. OpenAI's documentation covers OAuth for connector authentication and does not document custom headers, so a server that authenticates with an X-Api-Key header will not work from that screen. Our server also accepts the key as a URL query parameter for exactly this reason.
Why does ChatGPT need the API key in the URL instead of a header?
Because the ChatGPT connector screen takes a server URL and does not document a way to set custom HTTP headers. If your MCP server only authenticates with something like an X-Api-Key header, there is nowhere to put it. Servers that also accept the key as a query parameter, in the form https://example.com/mcp?key=YOUR_KEY, work around this. Treat that URL as a secret, because anyone holding it holds your key.
Does Codex support MCP servers?
Yes, both local stdio servers and remote Streamable HTTP servers. You configure remote servers in ~/.codex/config.toml under an [mcp_servers.<name>] table using the url key, with optional auth. Codex supports bearer tokens via bearer_token_env_var, OAuth via `codex mcp login <server-name>`, and static HTTP headers via http_headers or environment-sourced headers via env_http_headers — so unlike the ChatGPT app, header-based API key auth works properly.
How do you check whether an MCP connector actually worked?
Ask the assistant what social tools it now has. It will call tools/list and read back the tool names, which confirms both that the connection is live and that your key authenticated. In Claude Code, run /mcp to see connection status directly. An empty or missing tool list almost always means a wrong URL or a key that did not authenticate, not a broken assistant.
What should your first command be after connecting?
Something read-only, like asking it to list your connected social accounts. That calls list_accounts, proves the connection and authentication work, and cannot publish anything. Only once that returns your real accounts should you move on to drafting, then scheduling, and only then to publishing.
Is it safe to let an AI assistant publish to your social accounts?
It carries real risk, because a post is public the moment it lands. Use a key scoped to a single workspace, prefer scheduling and drafting over immediate publishing while you build trust, and check whether your assistant asks you to confirm each tool call before it runs. Be especially careful if the same assistant also reads untrusted input such as web pages or email, since that creates a path from content you did not write to a post in your name.
Which AI assistant is best for scheduling social media posts?
Claude, for most people. It has the cleanest connector setup, supports header authentication, works in both the desktop app and Claude Code, and supports MCP tools, prompts and resources. Codex is the best option if you live in a terminal and want header auth in a config file. The ChatGPT app works but requires Developer mode and, without documented custom-header support, a key passed in the URL.